1. Create a new document in photoshop of following dimensions and settings(modes):
2. Select the gradient tool and apply following settings to create background like shown below:
3. Add a new layer(Ctrl+shift+N) Then make a selection using pen tool And fill it with grey(#a8a5a0).
Using dodge tool and burn tool add mid tones to the shown places.Like this:
4. Add a new layer and draw a path like i did
Select brush tool and set its size of 2px. Then, Right click on the created path And choose stroke path option.We will get like this:
You will get like this:
5. Make a duplicate of the layer With the white stroke(Ctrl+j) and it right upto 1px.
Using eraser make it better
6. Select the metal part layer and after that add some shadows and highlights using Burn tool and dodge tool.
7. Add a new layer and then draw a rectangle of grey color like I did
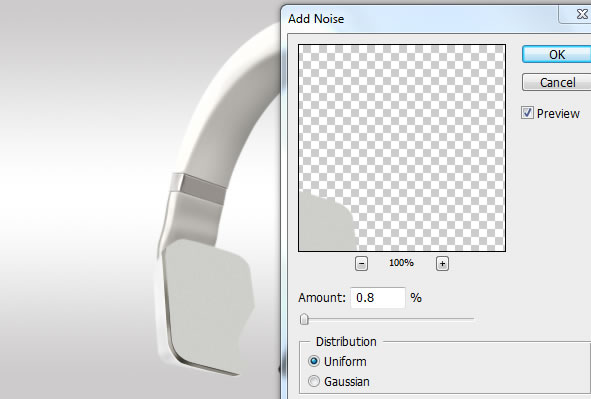
Now,go to Filters>Noise>add noise and apply below settings.
After that go to filter>blur>motion blur and apply shown below effect.
8. Reduce the opacity to about 15% and fix it over the metal part layer using wrap transform.
Erase the side parts with eraser tool.
Now do again as we have done in step 4 and step 5 to add white & black stroke.
Make a selection at the top of the metal part using pen tool and make it little darker using burn tool.
9. Add a new layer and draw the path using pen tool like shown below:
Now fill the path with light grey color.
After that go to filter>noise>add noise and apply settings shown below.
Add a new layer again(Ctrl+shift+N)And make a path shown below using pen tool.
Add 2 strokes(white & black)and after that using Eraser tool erase it for better effect.
Make a duplicate of the above created layer and put it in the right part of our top part layer.
10. Make selection as shown below using pen tool.
Add some shadow to that selection using burn tool.
11. Make a selection again with pen tool
Now using dodge tool add some light like I did.
12. Add a new layer and make a selection as shown in the image below.
fill it with grey color as shown below.
Then go to filter>noise>add noise And apply the settings shown below
13. Using pen tool make a path as shown below then right click on it and select 'make selection' and apply the settings for selection.
Add light in the selection using dodge tool.
14. Now make a selection again for bottom part.
Using burn tool add some shadow to it.
15. add a new layer and select the area with feather 0.3px as shown below
Fill it with grey(#97928e) color after that add some light and shadow to it
Again add some light and shadow.
16. Again, add a selection using pen tool.
And fill it with grey color(#b0ada8)
Add some light on it using dodge tool
After that using burn tool add some shadow to it.
17. Again make a new selection as shown below.
Fill it with grey(#ececec)
Using burn tool and dodge tool and some shadow and light at indicated places
18. Add a white stroke of 2px.
19. Again make a selection with feather radius:0.3px.
Add a new layer and fill selection with dark grey color and add some light and shadow.
Add a stroke of 1px on layer .
21. Draw a selection with feather radius 4-5
Fill it with grey color(#cecfca)
Select add noise from filters and apply below settings
22. Again draw the selection as shown below
And add some shadows and lights on the indicated points using dodge and burn tool
23. make the selection inverse(ctrl + shift +i/ctrl+i) And add some more shadows using burn tool
24. In the middle make a oval shape selection as shown below
Make it darker using burn tool or bright/contrast settings
In right part make Another selection
Using burn tool make it darker to get 3D look.
25. Add some shadow and light at top of the hole with burn and dodge tool.
By going to filter>noise>add noise apply below settings.
26. Add a new layer and Draw a selection like shown below using pen tool
Fill it with grey color(#c6c2bf)
27. Again make a selection.
Add some shadow using burn tool on mid tones.
Then add some light using dodge tool as shown in the image
28. Select another part as shown in the image
Add some shadow in mid tones using burn tool
Add some light using dodge tool after inverse the selection
29. Make a selection again using pen tool
And fill it with grey color
Use burn and dodge tool to create metal effect You can also use gradient tool for it.
30. Make another selection and fill it with grey color
Use burn and dodge tool to add some light and shadow
Add a stroke of 1px
31. Erase the stoke as shown below to make it look better
Make a duplicate of the layer and make it white the move 1px upwards.
FINAL IMAGE


IT look Like 3D Headset. beautiful!!
ReplyDeleteIts all due to effect of dodge and burn tool(shadow and light).
Delete